


Camp Miller Kitchen Renovation Series
Part 2
I write this next installment as I sit in my finished, renovated kitchen. I have a hot latte in front of me because we have the appliances to make this possible. I had scrambled eggs earlier from the stovetop. These small moments feel like major accomplishments.
If you’ve taken on a kitchen remodel, I bet you know what I’m talking about.
Renovating Camp Miller cost us a fair portion of our souls. In part one of the kitchen series, I shared with you the impracticalities of our project timeline. With full time jobs and a brand new baby in tow, it seemed we’d never finish.
But, let’s skip to the good part! We did finish. We did it mostly ourselves, mostly on time, and under budget.
Now, Camp Miller is a wonderful escape and a thriving vacation rental. Here’s how we got there.
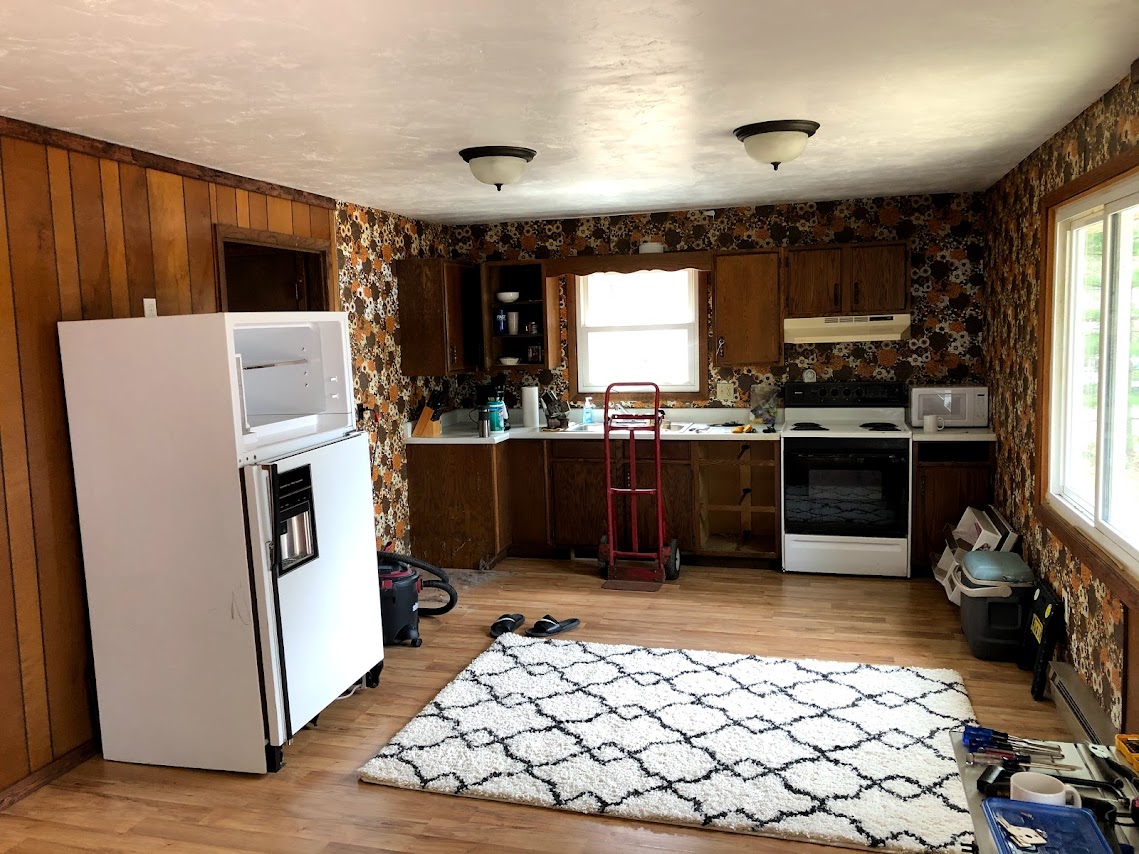
Kitchen Before and After
Before getting into project specifics, first let’s look at the kitchen before.

For fun, take a tour of the entire cabin. The tour takes 1 minute and 8 seconds. She’s a tiny one.
Some of the less-than-desirable elements included:
- VOC panel walls with wallpaper veneer
- “Boob” lights (That’s what we call them. Tell me I’m wrong).
- Yucky laminate counter and old sink that leaked
- Old and oversized appliances
- Old and worn cabinets
So, basically everything was not great. We addressed all of these issues for around $500.
Here is what the kitchen looks like today:

DIY Tutorials
Since I forgot to take video (cardinal sin of home renovation blogging), these tutorials are overly simplified. But hopefully, this post will serve as a starting point for your own renovation ideas. Nothing we did was overly complex or expensive. And yet, I believe, the difference in aesthetics and functionality are major.
VOC panel wall: detailed in part 1.
Cost so far: $0
The lighting
We outsourced this step. We absolutely love our electrician and needed him to address a number of electrical issues in the cabin that didn’t pass inspection. I do not include this cost when I talk about the kitchen budget, because we paid him once to service the entire house. However, for transparency sake, all electrical improvements cost around $3,000.
Because I’m a huge dork, I made a google slides presentation for our electrician. You’ll notice that we weren’t able to do all of our initial ideas. The flush-mount light we scrapped because we couldn’t find one we liked. The wall sconces weren’t a good option because our walls are VOC panelled which makes them hard to patch.
Our simple solution was to do all recessed lighting, plus a light under the vent hood. I happen to like recessed lighting. I have a hard time choosing fixtures, and I often think they make the ceiling look lower.

Cost so far: $0
(not counting electric in cost of kitchen)
The Vent Hood
I take no credit for this project either. Well, a little. We planned to throw out the old upper cabinets, plus one sliver of lower cabinets that didn’t fit the new configuration.
Turns out, that little lower cabinet was EXACTLY the same width as our new apartment-sized stove.
Matt used reclaimed barn board from my childhood home to wrap the frame of the old cabinet. He then found an undermount light on amazon.
We didn’t need a true vent hood with the electric stove, but I love the look and the lighting they provide. This was a fun, unique solution!


Cost so far: $80
Appliances
The old fridge and stove were huge. They were way too big for this tiny little kitchen.

We shopped Facebook Marketplace and scored a $50 fridge and $50 stove, both apartment sized. By downsizing the appliances, we were able to create a lot more counter space.

Cost so far: $180
The Counters
Purchased from Home Depot. We needed an 8’ run exactly, and they come in 8’ runs. We also needed a 2.5’ run for the L-shape. We bought the unfinished ash variety, sealing it with butcher block gel stain.
*Note: we will need to reseal again this year. This time I’ll do multiple coats, as the counters are already showing wear and tare.
The L-Shape
Matt built this from 2×4’s, mostly left over from other projects. I didn’t track this cost, but it was minimal.


Cost so far: $550
The Sink
We found it sitting in the middle of an aisle at Home Depot, marked $200 off. I think we paid $100 for this stainless steal, single drum Kohler sink. We found out during install, the lip is bowed a little, which is why it was on clearance.
We added a basic spout and spray handle package for another $70.
Cost so far: $620


Floating Shelves
I will dedicate a separate post to this. It was freaking awesome. We milled our own lumber at my grandpa’s farm. Coolest day ever.
Mounted with black shelving brackets from amazon.


Cost so far: $690
Renovation Reflection
Alright, so it was a little over $500. To be honest, until I wrote this post, I forgot about the undermount light in the vent hood and the shelving brackets.
But still. A whole new kitchen for under $700? I’m happy with that!
My favorite parts continue to be the wall/cabinet monotone color and the floating shelf. I’m also quite proud of the new configuration with smaller appliances.
I’m less satisfied with our treatment of the counters. I didn’t want to poly over them, because I wanted a more natural looking finish. However, for a kitchen that gets such heavy use, this may not have been the best choice. I’ll probably have to sand down the counters and reapply many coats of this gel stain.
Overall, I’m very satisfied with the Camp Miller kitchen renovation. I love the modern and rustic aesthetic, improved functionality of the space, and the fact that we get to fill it with guests!


Want to get in touch?
What questions do you have? Write them below in the comments or find me on Instagram. You can also join my Facebook group “How to DIY Your Home Renovation” where together we are cultivating a community dedicated to answering each other’s questions and sharing our proudest moments as DIY-ers.
Have you joined my email list yet? Please do! This is DIY Home School’s most sacred space.
Thanks for reading and good luck DIY-ing!
View comments
+ Leave a comment