


Bang for the Buck- How I DIY’ed an Entire Kitchen Island
Ok, confession time: I do not like spending money. Actually, to clarify, I don’t like over-spending. I like a bargain, I love a profit, and I care about spending my hard-earned dollars in meaningful ways. It’s important that you know that about me as it will clarify perhaps why I am so freaking excited about how my DIY kitchen island turned out.
Renovations at the LRH were humming along nicely. We are flashing back to the spring of 2019, after the flooring, beam, cabinets, counters, appliances, recessed lighting, etc. had all been installed. Truthfully, we could have stopped and called the kitchen complete.
Save for one crucial element. The kitchen design had been set around my vision of a massive island spanning the entire length of the 16′ room.

Lonely Island
Let’s be real… a solitary table looked dumb in this massive space. The room was begging for a giant island. I could already picture our future Packer parties, with everyone gathered around a surface that could easily support 8 crockpots. (If you’re from Wisconsin, you understand my priorities).

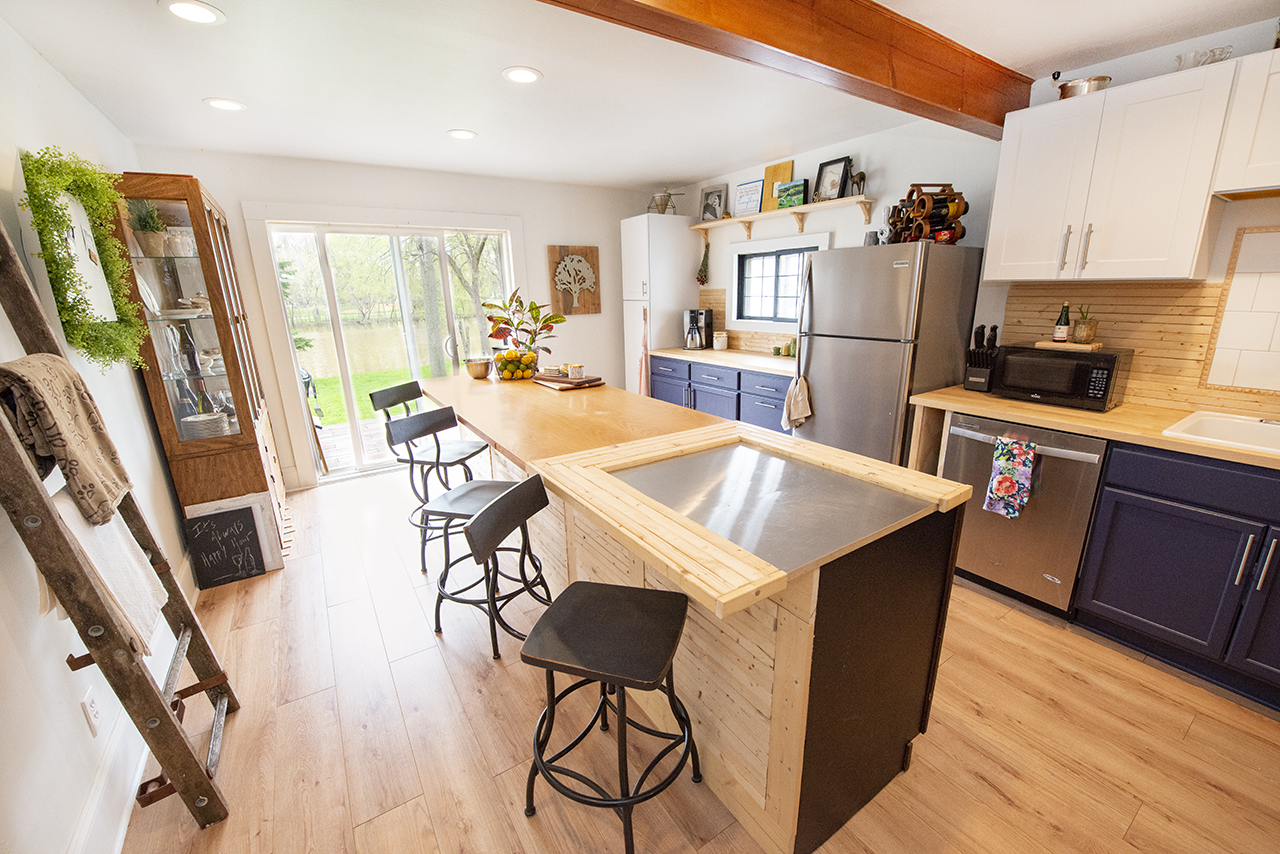
A Massive Piece That Still Leaves Plenty of Room
The 10 ft island ended up working exactly as I’d envisioned. I was lucky to have found this old run of cabinets that fit the space so perfectly!
I scrolled endlessly through Pinterest and interrogated Google ruthlessly: “cheap countertops,” “DIY countertops,” “how to save money on countertops.” Having recently purchased all of our lower cabinets from Home Depot (Hampton Bay- unfinished beech), I knew that the issue of cost was not related to the island’s base cabinets. The island top would be a huge investment, no matter which material we purchased. (**Do a quick search on 10′ x 3′ of Carrara marble, I dare you. Search laminate, for that matter. Eek is right.)
Estimating Costs
At this stage in the renovation, and knowing our potential resale value, we did not want to spend the estimated $1500-$2500 for the countertops alone. Add that to around $300 for the base cabinets, the hardware, paint, etc… we could easily have spent $3000 on this island. I started to panic when I realized that even if we used laminate (gross), our total could ring up to $1800 for a finished product we didn’t even like.
The Moment of Inspiration
That’s when I saw it. This beautiful run of old cabinets from Habitat Restore, the happiest place on earth. It was 10′ long. Inside, a shelf spanned the entire length, making it a strong candidate for the open shelving look. Scribbled on the back was the word “bakery,” and I fell in love. Using my detective skills, I guessed that this beauty had been salvaged from an old bakery. I could bring it back to life!


The DIY Kitchen Island
Transforming this giant piece of furniture into a sturdy and appealing island took some doing. See the carousel below for pictures of the transformation.
Step 1: Sand it down, stain it up
Using a hand-held electric sander, I smoothed out the entire unit. After the layers of grime and old wood stain came off, I used a tack cloth to wipe away the dust. Next, I stained the front and the pull-out drawers. The sides of the unit were MDF and not stainable. (Later, I painted the sides with black chalkboard paint).
Step 2: Add structural support
I expected the finished kitchen island to see a lot of use. For that reason, I wanted to make sure the base was sturdy. Nothing annoys me more than flimsy furniture. If you can’t lean on it or sit on it, it doesn’t need to exist.
First, I created a frame with a 1″ common board all along the backside. Using the same common board, I next added vertical “beams” that attached to the new frame. I had NO IDEA what I was doing… but a miracle of miracles, it ended up being pretty damn sturdy. I also added extra feet to support the bottom of the unit.
Step 3: Create a decorative backing
My novice structural supports looked bad. I needed to design a backing that would blend them into the rest of the island. I had some leftover furring strips from the kitchen back-splash, so I played around with these. To my total surprise, they stacked nicely inside the common board frames and ended up looking intentional! Pat on the back, me.
Once I had the backing done to satisfaction, my husband and I lugged the brute into the house. You should be impressed because it was very heavy.


But What About the Expensive Counter Top?
Man, I’m glad you asked because that was another lucky break. I should mention that the salvaged bakery unit cost $80. I completed the rest of the island for under $100. Here’s what happened.
I was shopping at Habitat restore (again) and realized that a standard door was 3 ft. wide. My counter needed to be 3 ft wide. And I liked the look of all-wood counters. Oh my god. So, I bought a $5 hollow-core door, made Matt come pick us up, and dove back into finishing the project!
Step 4: Fasten an old door to your cabinet base
This took like four seconds. I used L-brackets and screws. For such a seemingly complex problem, the solution was stupidly easy.
Step 5: Get creative with any remaining length
ANOTHER crazy idea popped into my head… what if the remaining couple of feet was stainless steel? We could use it as a chopping block. (**Google the cost of stainless steel countertops. Right. They typically cost more than marble).
BUT… Lowe’s sells stainless steel backsplash.
So, off I went to Lowes. I scored a deal on the backsplash, picked up some cheap MDF board for backing, and assembled it all together. Since the stainless steel sheet wasn’t exactly the size I needed, I framed it with leftover furring strips.


Now That It’s Done
This project stressed me out for weeks. I didn’t know how I was going to make it work. All I had was a picture in my mind. But I am an increasingly firm believer in this: when you ask the universe for something, and you are willing to put in the work, it will appear. I stumbled across the salvaged bakery unit (both lucky and proof of my constant shopping at Habitat Restore). I realized a door would work as a countertop (since the doors literally hit you in the face at Habitat Restore, I’m surprised I didn’t think of this fix sooner). And the stainless steel backsplash appeared out of nowhere (I mean, thank you creepy Google for knowing exactly what I’m looking for).
This was the most stressful part of the kitchen. But it is also the thing I’m most proud of. I got this thing done with a nail gun, chop saw, and a bit of ingenuity. And my husband’s muscles. We had to move this thing like 12 times. Thank you, Matt.
So, the question for today is:
What is your most clever DIY project? Was it planned or a happy accident?
Much love,
Becca


I am an increasingly firm believer in this: when you ask the universe for something, and you are willing to do the work, it will appear.
So beautiful well done!!
Thanks Bab! You know how I like the crazy ideas… luckily, this one worked out!
What an amazing design story! Love it.
Thanks Laura! Can’t wait to see more classroom pics- and pics of your new place!
It takes a special kind of creativity to walk past that quite sad, tired-looking cabinet base and see it transformed into this fantastic island! Not only is it beautiful, but it’s a brand new life for a piece of furniture that seemed to have passed its expiration date. Way to see the beauty that was still there waiting to be re-found! Who creates a massive kitchen island for a hundred bucks?!? Great job!
Thank you!! It was equal parts luck and leaving myself open to a crazy idea 🙂
[…] that covered for you too. DIY kitchen islands, and more DIY kitchen islands! Want some more? ‘Becca Mclagan‘ made this gorgeous DIY kitchen Island for under $100! Go find out […]
Wow! Thanks so much for the shout-out!